 A new baby is sitting on my desktop: yesterday arrived the MSP430 powered Launchpad development board. Â These few notes describe the steps I did to setup a development environment for this board on Ubuntu Linux 12.04 LTS 64bit.
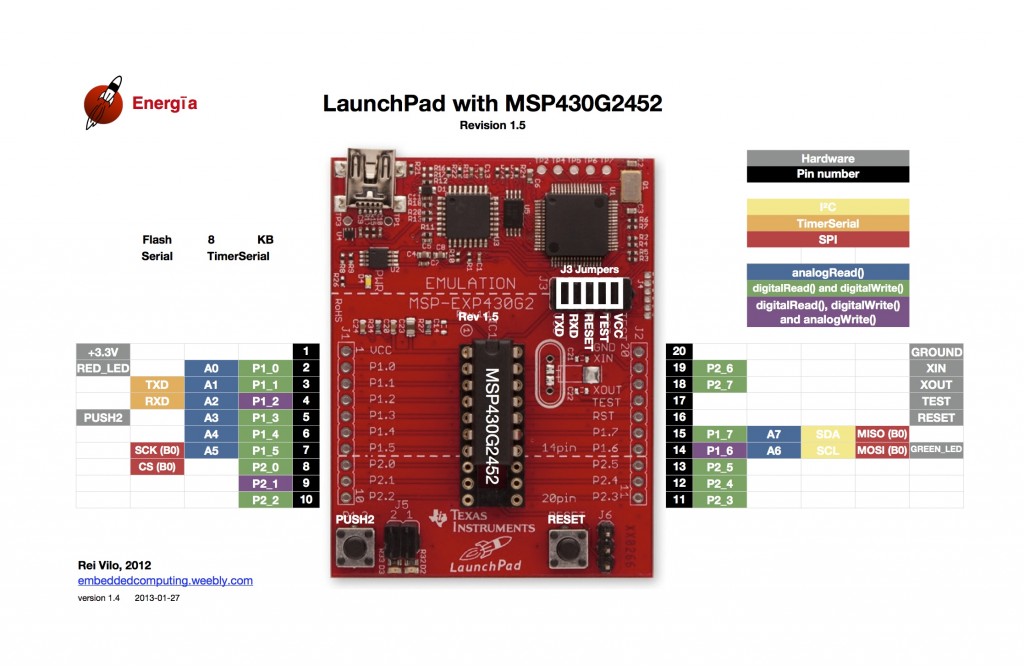
The launchpad board
Update: at the beginning of March 2012 TI raised the price of LaunchPad board to 10 $ shipping included.
The launchpad board is a low-cost (less than 5 € shipping included) development board based on Texas Instruments MSP430 family microcontrollers, it ships in a nice retail box with two different MCUs, an USB cable and a tiny 32KHz smd crystal ready to be soldered onto the board (you don’t normally need it for the basic operations), the software stack is a gcc backend and a clone of the Arduino IDE and libraries. This stack makes the switch from Arduino environment very easy.
The Arduino-like libraries are named Energia and can be downloaded as pre-packaged binaries from http://energia.nu/download/ or from the GitHub repository: https://github.com/energia/Energia
The community is still smaller than the huge Arduino community but it is growing fast, you can find a couple of useful links at the end of this article.
 Some “shields” compatible with LaunchPad are also available on TI store, particularly interesting the capacitive and audio shields, that add a touch interface and MP3 recording/playback capabilities to the device. For an overview of the available LaunchPads, see http://www.ti.com/ww/en/launchpad/overview_head.html
Comparison with Arduino
The intent of TI when they launched their development board was clearly to follow and exploit the huge success of Arduino, this paragraph will attempt to shed some light on similarities and differences of Arduino and LaunchPad+Energia.
Hardware
The Launchpad board is  shipped with two different MCUSs: MSP430G2553 and MSP430G2452, they are both 20 pin devices but the 452 has half the flash and RAM of the 5523.
Comparing MSP430 and Atmega328P is just like comparing apples and oranges but we can try to summarize tha main differences:
| MCU features |
Arduino/Atmega328P |
Energia/MSP430G2553 |
| Architecture |
8bit – RISC – Harward |
16bit – RISC – Von Neumann |
| Power supply (typ.) |
5V |
3.3V |
| Flash |
32KB |
16KB |
| PINs |
28 |
20 |
| Timers |
2 |
2 |
| PWM pins |
6 |
3 |
| RAM |
2KB |
512B |
| clock |
8 MHz int. or 16 MHz ext. |
16 MHz int. + optional low speed ext. |
| Development board features |
| on board LEDs connected to MCU pins |
1 |
2 |
| on board pushbuttons connected to MCU pins |
1 (reset) |
2 (reset + Â one spare) |
| on board debugger + emulator |
no |
yes |
| on board programmer |
no: bootloader only |
yes |
What we can tell for sure it that Atmega328P beats MSP430G2553Â in Flash and RAM size, but where MSP430 is clearly superior is:
- when used in low power modes
- CPU speed thanks to 16bit architecture
- MCU price: it costs about one third of the Atmega328P
- development board price: ~ 5 $ vs. ~ 25 $ of an Arduino UNO
On the contrary, Arduino compatible shields, Â community and software libraries are far ahead of MSP430/Energia.
Installing the software
First you need to install the compiler packages:
binutils-msp430 - Binary utilities supporting TI's MSP430 targets
gcc-msp430 - GNU C compiler (cross compiler for MSP430)
gdb-msp430 - The GNU debugger for MSP430
msp430-libc - Standard C library for TI MSP430 development
msp430mcu - Spec files, headers and linker scripts for TI's MSP430 targets
mspdebug - debugging tool for MSP430 microcontrollers
If you plan to use the Energia libraries which provide an Arduino-like environment, you should download the package from http://energia.nu/download/ and install them in a subfolder of your home directory, I installed them in a folder named “energia”.
To hold my sketches and libraries, I also created a folder named “energia_sketchbook”.
To summarize the steps:
$ sudo apt-get install binutils-msp430 gcc-msp430 gdb-msp430 msp430-libc msp430mcu mspdebug
$ cd
$ mkdir energia_sketchbook
$ wget -O energia.tgz http://energia.nu/download/downloadv3.php?file=energia-0101E0010-linux64.tgz
$ tar -xzvf energia.tgz
$ mv energia-0101E0010 energia
to access the serial port, you also need to add some udev rules:
sudo vim /etc/udev/rules.d/60-tilaunchpad.rules
# This file allows access to TI launchpad
# See udev(7) for syntax.
#

SUBSYSTEM=="usb",ATTR{idVendor}=="0451",ATTR{idProduct}=="f432",GROUP="dialout",MODE="666"
and then restart udev by:
/etc/init.d/udev restart
An additional step is required if you are on a 64bit architecture:
$ cd energia/lib
$ mv librxtxSerial.so librxtxSerial32.so
$ ln -s librxtxSerial64.so librxtxSerial.so
After doing this, you should be able to launch the Energia IDE with
$ cd
$ energia/energia
Development using a Makefile
I’m the kind of programmer that hates complicated IDEs, moreover I can’t suffer Java(TM), for this reason I tend to use Makefiles to compile MCU code and the first thing I did was to setup a development environment using a Makefile to do all the compilation, linking and upload stuff.
This Makefile is freely adapted from the good job done by Tim Marston at http://ed.am/dev/make/arduino-mk
You can download the latest version of the Makefile from my repository: https://github.com/elpaso/energia-makefile
$ cd
$ cd energia_sketchbook
$ wget https://github.com/elpaso/energia-makefile/raw/master/Makefile
The Makefile must be launched from within the directory containing the sketch you want to compile, the name of the directory must be the same name of the main sketch file which has the Arduino “.ino” file extension.
A couple of environment variables are used to instruct the Makefile where the libraries are located and to build code for the correct MCU (for a complete list of config vars, please refer to the Makefile itself, they are described in details in the header), you can set them once for all using .bashrc:
$ echo 'export ENERGIABOARD=lpmsp430g2553' >> ~/.bashrc
$ echo 'export ENERGIADIR=/home/your_username/energia' >> ~/.bashrc
$ . ~/.bashrc
Hello world!
You are now ready to test your new Launchpad, the “Hello World” program for MCUs is the classic Blink program, which just blinks one of the two leds available on the board, you can just copy the example provided with the Energia IDE:
$ cd
$ cd energia_sketchbook
$ cp -r ../energia/examples/1.Basics/Blink .
$ cd Blink
$ make -f ../Makefile target
You now need to connect the board to your PC with the provided USB cable.
$ make -f ../Makefile upload
If everything went fine, you will see a nice blinking led at 1Hz on your Launchpad board.
The serial nightmare
The board has onboard USB-to-serial logic, but I had a really hard time before I could use it, and it’s still somewhat unstable.
UPDATE: there is now a nice method to fix the serial problem:Â https://github.com/capnm/LaunchPad
Basically, there are some problems with the acm_cdc driver provided with latest Ubuntu kernels, I could make it work following the instructions on https://github.com/energia/Energia/wiki/Linux-Serial-Communication
More info in this post (and previous pages):
http://e2e.ti.com/support/low_power_rf/f/156/t/53610.aspx?pi239031349=3
You will need to compile a patched kernel module named cdcacm (the stock module is called cdc_acm), and you mileage may vary, after compiling and loading the patched module I was able to read from serial just doing:
$ cat /dev/ttyACM1
Sometimes I still need to unload and reload the module with:
$ sudo rmmod cdc_acm
$ sudo modprobe cdcacm
Conclusions
Arduino and Energia differs too much, but I think they are both interesting devices, given the very low price of MSP430 and the Arduino-like development environment I feel that I will be using this MCUs wherever I can as long as I don’t need much flash and RAM.
Flash, RAM, community, libraries and examples are what make Arduino great, let’s see if Energia community will grow  fast and if TI will release more powerful MCUs for this interesting development board.
Useful links
Happy hacking!
See also my new article about MSP430:
https://www.itopen.it/2013/03/18/driving-a-pair-of-7-segments-display-with-msp430-energia-libraries/

 A new baby is sitting on my desktop: yesterday arrived the MSP430 powered Launchpad development board. Â These few notes describe the steps I did to setup a development environment for this board on Ubuntu Linux 12.04 LTS 64bit.
 Some “shields” compatible with LaunchPad are also available on TI store, particularly interesting the capacitive and audio shields, that add a touch interface and MP3 recording/playback capabilities to the device. For an overview of the available LaunchPads, see http://www.ti.com/ww/en/launchpad/overview_head.html
kota
Errors were encountered while processing:
/var/cache/apt/archives/gdb-msp430_7.2~mspgcc-7.2-20110612-1ubuntu1_i386.deb
E: Sub-process /usr/bin/dpkg returned an error code (1)
Alessandro Pasotti
@kota: confict with another package? You should see the complete error message…
Robert Thille
This is months late, but that dpkg error is probably the same one I ran into. You have the plain ‘gdb’ package installed, and gdb-msp430 is trying to install a file which gdb has already installed (different contents, probably) and so dpkg complains and exits. Really, gdb-msp430 should declare a conflict in the package information, but to work around, you can uninstall gdb first…